In order to collect monitoring data inside your network, you need to install Uptrends Infra’s agent software. This article will outline the steps to take to install the Uptrends Infra agent on your Linux machines.
Uptrends Infra agent installation
Dependencies
The Uptrends Infra agent has some dependencies for some of its sensors. That means that before the Uptrends Infra agent can be used, you’ll need to make sure to install these dependencies.
- For all distributions: to install the agent on a Linux machine, you need the libicu package. To install this package, run
yum install libicuorapt-get install libicu63, depending on your distribution.
Installing the agent
Now that we have our dependencies up and running, it’s time to install the Uptrends Infra agent service itself.
- First, download the infra agent software. Check Uptrends Infra agent 2.0 for Linux for the download link. By default, the wget command downloads files to the current working directory. Keep that in mind as you download this file. After this step, make sure the current working directory is the one that contains the UptrendsInfraAgent-2.0-Linux-x64.tar.gz file.
- Copy the software tarball to the system and extract it. The default installation location for the Uptrends Infra agent is in /opt/UptrendsInfraAgent – we recommend not changing this.
sudo mkdir /opt/UptrendsInfraAgent
sudo tar -C /opt/UptrendsInfraAgent -zxvf <pathToTarball>/UptrendsInfraAgent-2.0-Linux-x64.tar.gz
sudo chmod +x /opt/UptrendsInfraAgent/Uptrends.Infra.Agent
- Now that the agent has been unpacked in the right location, we can run it for the first time. Let’s do this manually in console mode, meaning we’ll have a command line interface to control the operation of the agent (as opposed to service mode running in the background):
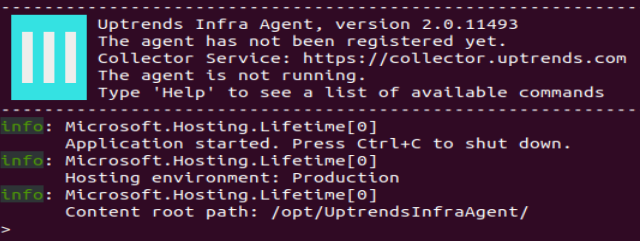
sudo /opt/UptrendsInfraAgent/Uptrends.Infra.Agent consoleThe Uptrends Infra agent splash screen will show. It should give a warning: The agent has not been registered yet. Let’s take care of that next.
Registering the agent
To register the agent, enter the following command into the agent’s command line interface:
register <username> <password>
where <username> and <password> are to be replaced with your Uptrends Infra user account credentials.
The agent should notify you that it has been successfully registered. The device on which you installed it should be automatically added to your Uptrends Infra environment.
Starting the agent
Now that the agent has been registered, we can take it for a spin! To start up the agent, simply use the following command:
start
The agent will start its internal measurement process, and you should start seeing results for the device on which the agent has been installed in your Uptrends Infra interface before too long (we’ve created several default sensors). You can exit the agent console by giving command quit.
Configuring the Uptrends Infra agent as an auto-started service
To configure the Uptrends Infra agent to start up automatically, follow these steps:
- Copy the agent service unit file to your systemd system services directory (run as a single command):
sudo cp /opt/UptrendsInfraAgent/uptrendsinfra.service /opt/UptrendsInfraAgent/uptrendsinfra-agent.service /opt/UptrendsInfraAgent/uptrendsinfra-agentguard.service /etc/systemd/system/ - Reload the systemd configuration:
systemctl daemon-reload - Enable the service to run when starting the system (run as separate commands):
sudo systemctl enable uptrendsinfrasudo systemctl enable uptrendsinfra-agentsudo systemctl enable uptrendsinfra-agentguard - You should now be able to start the service:
sudo systemctl start uptrendsinfra - Subsequently, you can verify its status using (run as separate commands):
sudo systemctl status uptrendsinfra-agentsudo systemctl status uptrendsinfra-agentguardThe output should show the service is now active. This command may be exited by pressing q. You can test whether the service starts up correctly when the system starts by rebooting now, if possible.
Upgrading an existing agent installation
It’s possible to upgrade an existing agent on your Linux servers to the newer version. In order to do so, you must first make sure the existing agent is stopped, before continuing with the installation. To stop the original agent, use command: sudo systemctl stop uptrendsinfra-agent
To check if the agent has stopped, and is currently inactive, run the following command (which can be exited by hitting ‘q’): sudo systemctl status uptrendsinfra-agent
The agent should have a status of inactive (dead).
At this point, you can proceed with the installation as described in this article. All necessary files will be automatically overwritten over the course of the process. If you’re upgrading from previous versions of the agent, you may need to re-register the agent by supplying your Uptrends Infra credentials.