To effectively monitor your API, you often need to create a sequence of HTTP requests, where each request retrieves data from a previous request to perform the next set of tasks. With the Multi-step API monitor, you can set up multiple HTTP requests, define variables , create user-defined functions , set up custom scripting , and many more.
Here are some possible scenarios why you should run a sequence of HTTP requests:
- Your API requires authenticated access — an API client must verify their login credentials first to access HTTP methods (for example, using the OAuth authentication).
- You want to test a functional scenario in your API consisting of multiple steps that are typically executed in a particular sequence by your end users.
- Your HTTP request returns a redirect to a different URL, and you want to inspect that response’s behavior before following the redirect.
Features of the Multi-step API monitor
The Multi-step API monitor gives you full control over the complete HTTP request content. Its features include:
- Set the HTTP method, URL, request headers, and request body for each request.
- Add authentication (Basic/NTLM/Digest/OAuth) or including client certificates to gain access to protected APIs.
- Define assertions (checks) for each response to verify the HTTP status code, content checks (based on plain text, JSON content, or XML content), request duration, and more.
- Extract contents from the response body, response headers, cookies and store them in variables . Such variables can be used in later steps to build new URLs, request headers, and others.
- Use global definitions such as pre-defined variables , user-defined functions , custom API metrics , and hashing and encoding .
These features help you ensure that your API behaves correctly and performs within the limits you specify. The step-by-step approach allows you to set up very powerful scenarios without adding complexity. As long as you know how your API should behave, you don’t need to have any programming skills to get started with API monitoring.
Create a Multi-step API monitor
To add a multi-step API monitor:
- Go to and click the button.
- In the Select a monitor type popup, click Multi-step API and click the button.
- Once the monitor is created, give your monitor a Name.
- Set the Check interval. Your check interval is the time between the end of one check and the start of the next.
- Switch to the Steps tab to input the details for each step.
Your new monitor starts out with one (empty) step. You can do any of the following:
- Click Add request step to add additional steps.
- Click the > icon beside each step to expand and edit step details.
- Click the copy icon to duplicate and create a copy of an existing step.
- Click the X icon to delete a step.
- Use the Move step up and Move step down buttons to move the position of the steps.
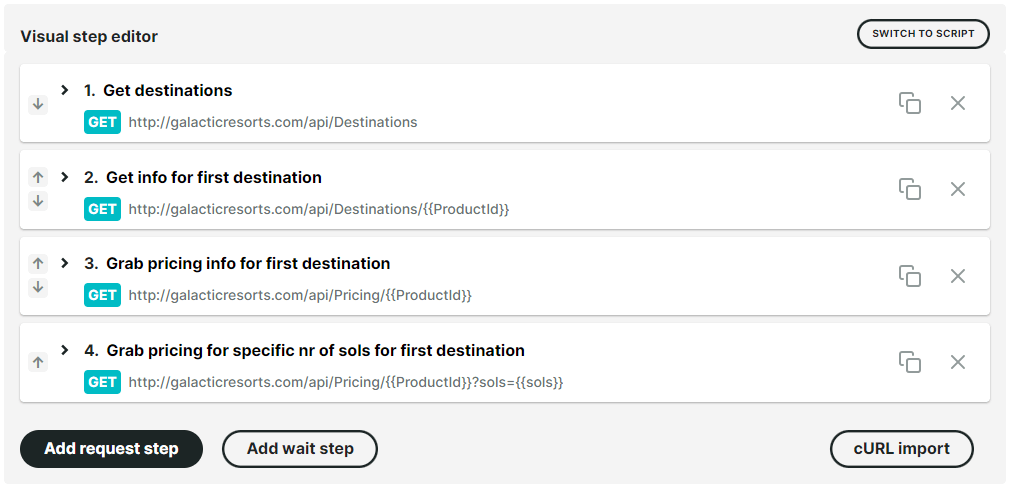
Configure a Request step
Looking at the Visual step editor, you’ll see the Request tab. A step in Multi-step API monitoring consists of one round-trip call to the API (for example, one request and one response). Within each step, you can define your request and tell Uptrends how to handle the response. Each Multi-step API starts with one empty step.
Request
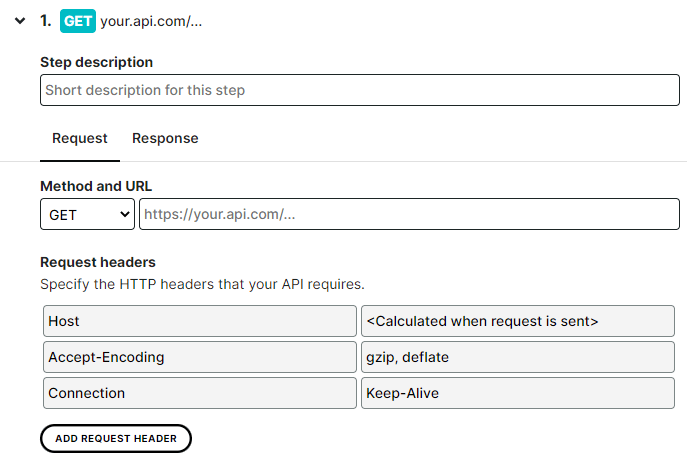
The Request tab contains all of the data needed to perform the actual HTTP request in the step. At a minimum:
- Choose the appropriate HTTP method, either GET, POST, PUT, PATCH, DELETE, HEAD or OPTIONS. If you need a different method, contact us .
- Fill in the URL for the request. Use a fully qualified URL, including the schema (“https://” or “http://"), the domain name and path for your API, and any query string parameters you want to include.
Request body
When specifying a POST, PUT, PATCH, HEAD, OPTIONS, or DELETE request, the Request body field lets you send specific data (payload) as part of the request definition. For example, sending a specific username and password to create a new user account.
The following are the request body data formats that you can choose from:
- Raw text — allows you to send plain texts without any formatting.
- Upload a file (as form-data) — allows you to send a file (such as images and documents from the Vault ) in form-data format.
- Upload a file (as binary) — allows you to send a file (such as images and documents from the Vault ) in a raw binary data format.
- Multi-part form — allows you to send multiple types of content in different formats (such as plain text entries or files retrieved from the Vault ) all at once.
In most cases and depending on the chosen data format, the correct Content-Type request header value is automatically set (such as multipart/form-data) to let the server identify, read, and process your data correctly. You can also specify the Content-Type request header which will be discussed in the next section of this article.
Request headers
An HTTP request usually contains some request headers to specify the format of the data that’s being sent, or to further describe what kind of response is expected. When setting up a request step, you’ll notice that certain headers are added automatically. These headers consist of a default set, depending on the type of request you’re making (for example, GET requests will have a different set of headers than POST requests). To override a default header, simply add a new header and name it exactly as the existing one, but with a different value.
You can also add new headers by following these steps:
- Click the Add request header button to add a request header key and value.
- Fill in Content-Type as the header key.
- The appropriate header value depends on the data you’re sending. The most common content types are
application/jsonfor JSON data,text/xmlfor XML data, andapplication/x-www-form-urlencodedfor webform data.
Similarly, if your API requires you to include authentication, include a header Authorization along with the appropriate data in the Value field.
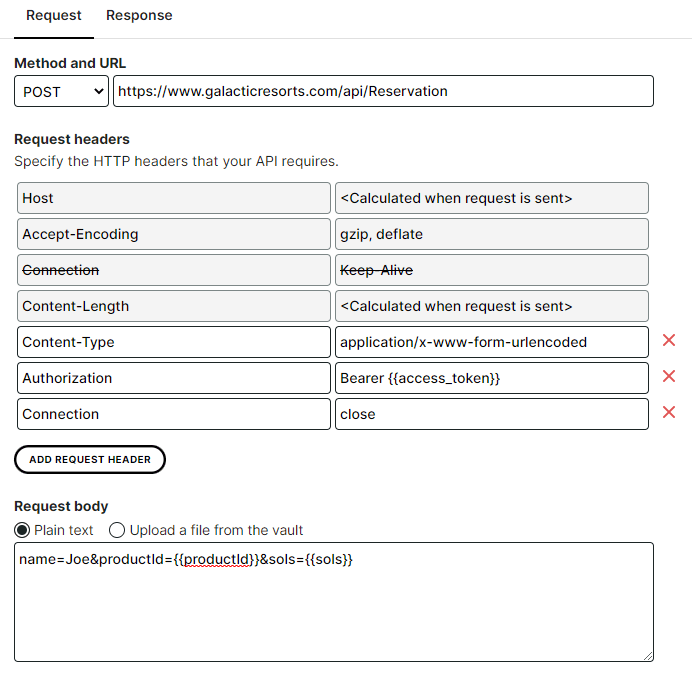
The image above shows an example of a request step. Notice the following:
- It is a POST request to
https://www.galacticresorts.com/api/Reservation - The default headers set for this request are:
HostAccept-Encoding
- The values for the
Hostheader will be determined upon sending the request. - Manual headers
Content-TypeandAuthorizationhave been added, to specify the data format and provide the necessary credentials, respectively. - Default
Accept-Encodinghas been overridden. - The request body contains some
x-www-form-urlencodedcontent, referencing some variables .
Authentication
A lot of APIs are protected and can only be accessed by supplying login credentials. If your API uses authentication on the HTTP protocol level, choose your type of authentication (Basic, NTLM or Digest) and fill in the corresponding username and password. Alternatively, you can set up OAuth based authentication using separate steps. More information on setting up built-in or custom authentication .
Use of credential set from the vault
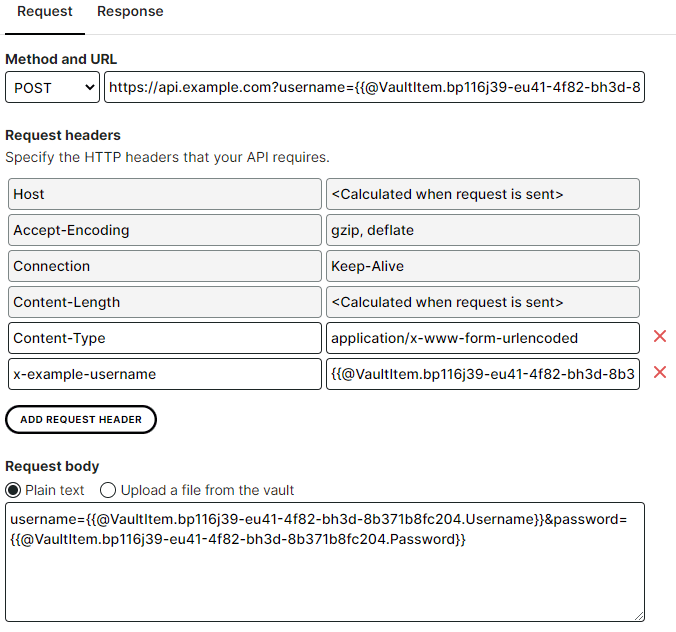
It is possible to use
vault credential set
references at any point as part of the request body, request headers, or as the value for your username/password under Authentication. To refer to a vault item, use the following syntax: {{@VaultItem.<itemGuid>.Password}} or {{@VaultItem.<itemGuid>.Username}} depending on which value is required. To find the itemGuid, navigate to the vault item with the credential set, then copy the last part of the URL in the URL bar of your browser.
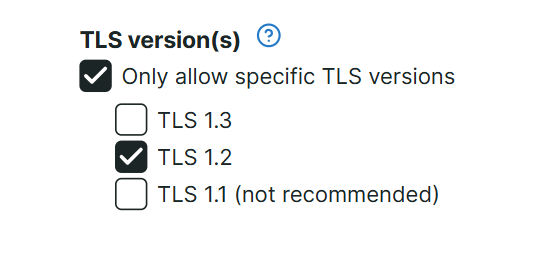
Set the TLS versions
The Transport Layer Security (TLS) is a security protocol that authenticates, encrypts, and protects connections between websites and servers. By ticking the Only allow specific TLS versions checkbox in your MSA monitor, you can select specific TLS versions during the TLS handshake for HTTP connection. You can also uncheck the checkbox if no restrictions are needed.
All Uptrends checkpoints support TLS 1.1 and TLS 1.2. Selecting the TLS 1.3 option limits Checkpoint selection to those with TLS 1.3 capability. While TLS 1.1 is still available, it is not recommended.
Import cURL requests
It is also possible to directly import cURL requests to create your steps, without having to manually recreate them. To do so:
- In the Visual step editor (in the Steps tab of the monitor settings) of the Multi-step API monitor in which you wish to import a step based on a curl command click the cURL import button to open the import wizard.
- Click the Next button.
- Paste your cURL commandline statement(s). For example, let’s say we want to create a step based on cURL statement:
curl -X POST https://www.galacticresorts.com/api/Reservation -H "Content-Type: application/x-www-form-urlencoded" -u username:password -d "name=Joe&productId=97f8fcc9-11b5-4d86-b208-ccb6d2be35e3&sols=5"
This is a request to create a reservation on our fake holiday booking testing site, GalacticResorts.com .
You can add multiple steps at once, by pasting multiple cURL commands.
- If necessary, specify the command format. In most cases, however, ‘Auto-Detect’ will suffice.
- Click the Next button.
- In the final step of the wizard, click the button.
The result for the cURL command mentioned in this example would be as follows:
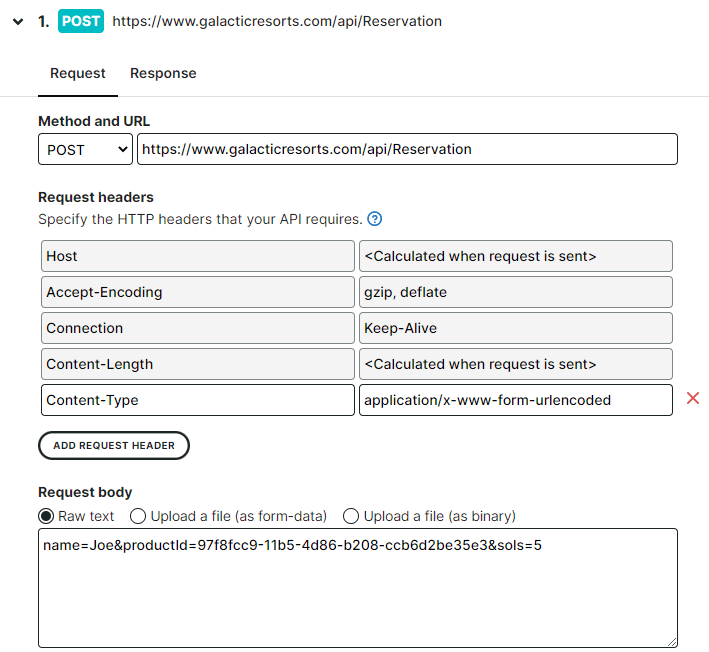
The Multi-step API monitor type doesn’t support all the options included in the cURL command line. Unsupported options will be automatically discarded, so make sure to try out the step to verify that it works as expected.
Response
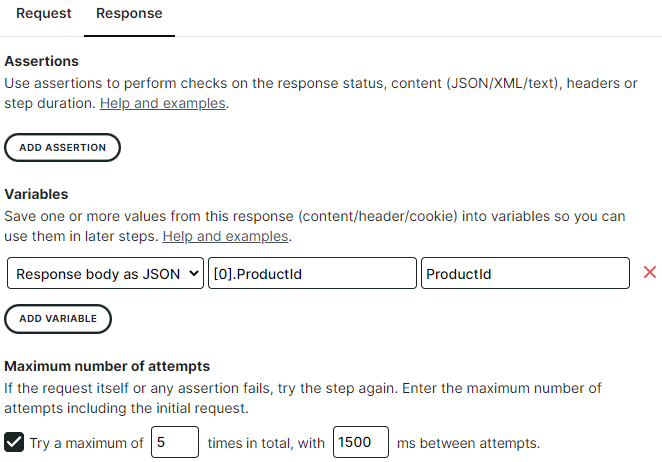
The response tab contains all options for performing checks on response data (using Assertions) and processing that data in preparation for the next step (using Variables).
Assertions
Defining your steps and feeding the correct data into those steps is the ground layer for a useful setup. However, it’s also important to look at the results of each step. Just calling a series of URLs is no good if they’re not returning the right results. Assertions help you with those health checks.
Assertions are checks you can execute to verify that the response in a particular step behaved as expected, for example, by checking its content or verifying that it was retrieved within a certain amount of time. Like with variables, you specify the source for the check, e.g., a JSON property from the JSON response body, an XPath query on the XML response body, or even just the status code of the response, its duration or content length.
More examples of Assertions: read our extensive guide for defining assertions .
Variables
When you’re setting up multi-step scenarios, it’s likely that at least one of those steps depends on some input retrieved during a previous step. By capturing that input, storing it temporarily and taking it across to the next steps, you’re creating a natural progression of connected steps, without the need to write any code.
Variables let you do exactly that! Each step can create new variables and has access to variables created by other steps, so you can re-use data that was captured previously in the scenario.
You can define where a variable should come from: probably a particular value from JSON or XML data, but capturing response headers or even data from a redirect is also possible. After a variable has defined, you can use it anywhere in your multi-step setup simply by referring to it by name: {{my-variable}}.
More examples of Variables: How to define and use variables .
Maximum number of attempts
In some cases, it may be that your API needs some time to process an incoming request before it can respond indicating a success. For example, let’s say you upload a file to your API for processing. While it’s processing, the API responds to requests regarding the status with {"result":"processing"} in a JSON body. Once processing finishes, the API starts responding with {"result":"success"} instead. In such cases, you can configure the monitor to keep polling the API until it responds with a success by using the Maximum number of attempts setting.
This function will set the monitor to retry the step if one or more of the assertions in the step (such as Response body as JSON result Is equal to success for the example mentioned above) fails. You can set how many retries the monitor should attempt, up to a maximum of 50 retries. Note that the minimum number of attempts is two, since the initial request already counts as the first attempt.
In addition to the number of retries you can set the wait time between those attempts. The wait time between attempts should be between 500 and 30000 ms and is set to 1000 ms by default.
For each step, you can configure a maximum number of attempts in combination with a minimum wait time inbetween.
The monitor will continue retrying the step until either the maximum number of retries is reached or every assertion passes. At that point, the monitor will proceed as normal, executing the rest of the steps in order. If the maximum number of retries is reached, and still at least one assertion fails, the monitor will report an error in the monitor log.
The cost of the MSA monitor remains the same, regardless of the number of retries it uses.
Configure file uploads
Multi-step API monitors allow you to upload files from
your vault
as part of one of your request steps. Any HTTP steps you configure in the Multi-step API monitor that contains a request body may be either a form-data or binary file upload or a regular plain text request. Files will be sent as multipart/form-data or binary content. To add a file as form-data, follow these steps:
- Upload the file in question to your vault. The maximum file size is 2 MB.
- In the settings of your Multi-Step API monitor, add a request step or use an existing step to execute the file upload.
- In the Request tab of the step that should execute the file upload, set the request method to POST, PUT, or PATCH (depending on which you require) and fill in the request URL.
- Under Request body, select option Upload a file (as form-data).
- Click the Add file from vault button that appears.
- Choose the appropriate file from the Vault file upload list and click the button.
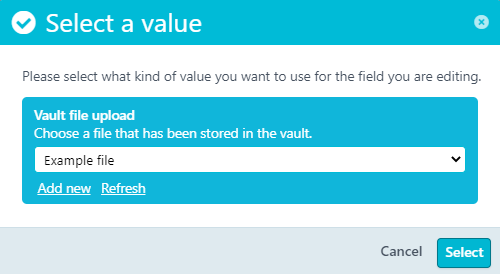
- It is not necessary to add any specific request headers. We will automatically set a request header for
Content-Lengthand setContent-Type: multipart/form-datawith the correct boundary.
If you want to upload a file without Uptrends adding Content-Disposition metadata to the request body, you can select Upload a file (as binary) under Request body at step 4 above. We’ll still automatically generate the appropriate headers listed at Request headers, but without adding this specific metadata to the request. This way, if your API expects files uploaded as raw binary data, you still will be able to test it.
Keep in mind that your API may be expecting a specific value for the file name. The request will include an automatically constructed header Content-Disposition, containing some metadata. The value for this header contains a name parameter. By default, we’ll use the file name as specified by you in the vault. Please make sure the file name you specify when adding the file to the vault matches the value expected by your API. For example, if your API expects the uploaded file to be named “image”, make sure you specify “image” (without a file extension) as the file name in the appropriate vault item.
Configure a Wait step
When you’ve added a sequence of Request steps to your monitor, each step will be executed as soon as the previous step finishes, without any delay. However, this immediate execution may be a bit too quick for some scenarios.
Consider an API method that acts as a request for a report file to be generated. The API kicks off a backend process that will generate the file, and instructs the caller to send a second request in order to download the new file. Generating that file may take a second or two, so the caller should wait for a few seconds before sending the second request. If the second request is sent too soon, it will fail since the generated file isn’t ready yet.
For this scenario, it’s important to wait before the second request is executed. To do this, you can insert a separate Wait step. This type of step allows you to specify the number of milliseconds to wait. For example, to wait 3 seconds, specify 3000 milliseconds as the wait time. This wait time will be included in the total time metric for this monitor.
To add a wait step, simply click the Add wait step button and specify the number of milliseconds you want to wait. If necessary, you can move the wait step to the right spot in your scenario using the Move step up/down buttons.
The wait time for a wait step is limited to 60 seconds: a wait step is not intended to monitor a long-running task that takes several minutes or hours. If the monitor exceeds the maximum total running time, the check will stop running and a failure will be reported.
Adding a wait step to your monitor doesn’t cost you anything. The cost of a Multi-step API monitor is only based on the number of Request steps.
Multi-step monitor results, errors and alerting
Multi-step API monitors behave in the same way as any other monitor. Each check appears in the monitor log, and displays extensive information for each individual step. For each step, this information consists of the following:
- Total duration of the step (in milliseconds).
- URL that was executed during that step.
- HTTP status code that was returned.
- Result for each assertion (pass or fail).
- Request headers and content that we sent.
- Response headers and content that we received.
If a problem occurs during one of the steps, or if one of the assertions you defined does not pass, the monitor will fail and report an error. As usual, these errors can generate alerts based on your alert definitions.